
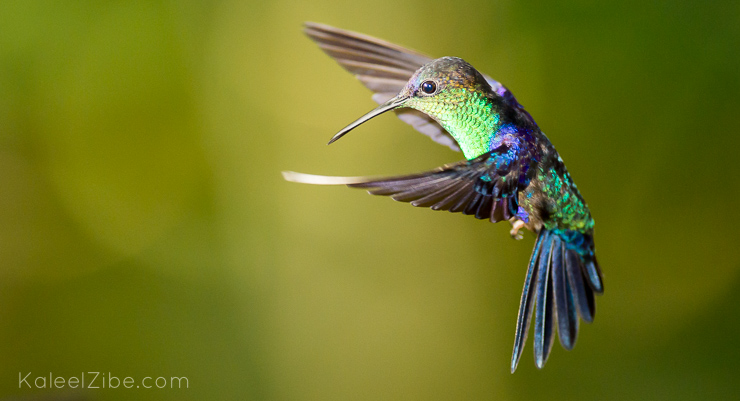
Male purple-crowned woodnymph hummingbird, Costa Rica. This shot required a very fast shutter speed of 1/4000 s as well as flash. It was also manually pre-focussed
Photographing birds in flight is one of the most common things to want to achieve in wildlife photography, but it can be fiendishly difficult. Here I’ll go through some of my tried and trusted techniques to help you avoid some of the pitfalls.
Freemotion Support
In general, I find it best to try and avoid using a tripod if possible because this gives you freedom of movement in three dimensions. This may not be practical if you’re using a very large lens, but then using a very large lens with a long focal length can multiply the problem of tracking a bird in flight anyway. Consider the difference between the naked eye and a telescope: with the naked eye, it’s easy to watch and follow a bird in flight, even if it’s moving quickly and erratically.
Then imagine trying to keep this same bird in the much smaller field of view of a telescope. In reality, what happens is that the bird moves in and out of view as you struggle to follow its motion. Similarly, having to physically move a long (and probably heavy) lens around to keep up with a fast flying bird is pretty difficult, although it can be made easier by using a gimbal head like the Wimberley.
So, if you must use a tripod, try and make sure the head allows smooth, fast, free-flowing movements.
Flight mode
Ok, let’s have a think about camera settings. What you’re aiming to achieve here is a sharp shot of a fast moving bird and you need to give yourself every chance to capture this in the heat of the moment. Set your camera to continuous release mode (Nikon) / continuous shooting drive mode (Canon). This allows your camera to rapid-fire a sequence of shots in quick succession.
Then set the focus mode to continuous autofocus so that the camera adjusts focus continuously as long as you have your finger on the shutter button. On a Nikon camera, this is AF-C and on a Canon, it’s AI Servo. AI Focus is a Canon intermediate mode which is a bit like Marmite: you either love it or hate it. What this mode does is try to determine when you need single focus and when to switch to continuous focus. When I used to shoot Canon on the 5D I really didn’t like it, but if you’re a Canon aficionado, give it a go.
As for shutter speed and aperture, you’ll need enough speed to freeze the motion without running out of light. Increase the ISO if you haven’t got enough speed. I tend to use middling apertures for birds in flight to get enough depth of field to catch the head and part of the wings. That’s usually about f/8 to f/11.

Keel-billed toucan, Costa Rica. Focus on the eye and use a medium depth of field
Fine tuning
Modern DLSRs have a bewildering array of extra settings to help you get focus right in continuous mode. A couple of the more useful ones for our purposes are:
- the number of focus points;
- how long the camera tracks the subject.
These settings are often buried in a deep settings menu, but are sometimes more accessible. They’re well worth looking at.
When setting the number of focus points that the camera uses for autofocus, you’re likely to get different answers from different people. I personally prefer to use fewer focus points because it speeds up the autofocus system (it doesn’t have to do as much work) and it makes selecting the area of focus more accurate. This latter point is important because if you let the camera use all its focus points at once, how do you know it hasn’t locked onto the end of the wing instead of the eye of the bird? The eye is arguable the most important focus point on an animal because it creates a connection with us in the photograph. Usually, the image is weakened if the eye isn’t in focus, unless you have a good reason for focusing on a different part of the bird to draw attention to that.
I often set the number of focus points to a single point to get as much accuracy as possible, but when this is proving difficult to attain any kind of focus (you do have to be pretty accurate), I’ll usually go for 9 or 21 or something similar, which is a good compromise of area and speed.
How long the camera tracks the subject before it attempts to focus on something else is a good way of adjusting the camera’s response to the type of flight involved. Typically you have the option to set the length of time the autofocus system locks onto the part of the bird it thinks is in focus. Initially, you might expect it to be best to set this to as long as possible so that once you’ve locked focus, it’s best to keep that focus even if your quarry veers around the frame. The problem with this is that if you haven’t locked on to the correct part of the bird, the camera will keep this incorrect lock for a long time!
So, in practise, it’s best to keep the tracking time short, or even off altogether. This is rather an acquired taste and I’d advise you to experiment to see what suits you.

Red kites may be large, but they’re extremely fast and agile. Catching them in the frame takes patience
Pan handling
When birds fly across your field of view from one side to the other, the best way to follow this linear motion is to pan the action by swivelling your body at the hips. Grip the camera to your eye with your right hand while supporting underneath the lens with your left. Your left elbow should point downwards and you can tuck it into your chest to provide stability. This helps lock out some of the vertical vibrations and provides a solid position to pan with.
Follow the bird’s flight path and fire off a number of shots in continuous release mode. With any luck, one of these shots will be sharp.
Incoming!
Let’s take puffins as an example. One of the delights of the Farne Islands is that you’re inundated with puffins in flight. On the up side, this means that there are several opportunities to practise flight shots. On the down side it often means too much choice! Let’s stick with the up side. From experience, the best way to photograph puffins is to put the camera down for a few minutes and watch where they’re coming from first. They often forage in the same place (which can be tens of miles away) and will come back to the islands from the same direction. This direction depends presumably on factors like the wind and so on, but you can quite quickly determine where your quarry is likely to come from. There are usually two or three hotspots like this on each of the main islands at the Farnes.
The next obstacle to surmount (assuming you’ve found a reliable flight path) is to get your camera to track these little birds as they come in at speed. Many people say to me that, having never encountered a puffin before, they’re surprised at how small they are: sort of pint-sized. Less to aim at! In fact puffins are also deceptively fast: they appear on the horizon as a dot and seem to spend a long time to grow to puffin-sized missiles. It’s important to give your camera’s autofocus system as much time as possible to lock onto the flying puffin. Start tracking the bird as soon as you see it in the distance and keep your finger half pressed on the shutter button to continuously focus until the bird is a good size in the frame.
At this moment you’ve probably relaxed, assuming you’ve got the shot in the bag; at which point the bird appears to accelerate and change direction, zooming over your head. I’ve lost count of the number of times this has happened. The trick here is to try to anticipate what’s going to happen. Ok, each puffin is different and you’ll get more blurred shots than keepers, but persevere, and you’ll hopefully get one sharp. Practise indeed makes perfect.
Another thing about puffins: if they haven’t come in to land with their trademark sand-eels, it’s probably because they can see marauding gulls waiting for them. Fear not! They’ll usually do several circuits of the island and attempt a further landing, so it’s worth keeping an eye on the same bird to see if it comes round again. I once watched one for thirteen circuits before I lost sight of it!

Puffins are surprisingly fast and often change direction at the last minute

Fighting arctic terns at the Farne Islands. There’s just enough motion blur in the wings to give a lift to the action
Creative Blur
So far, I’ve been talking about taking sharp shots of birds in flight. Sometimes if the shot is too sharp though, it can freeze the motion so much that all sense of movement and action is lost. In this case, it’s worth thinking about lengthening the shutter speed a bit to allow some motion in the wings.
Exposure
To an extent, if there are dark areas on the underside of the bird you’re photographing, you can lift those shadows in post-processing, particularly if you’re shooting in RAW. However, there is a limit to this and if you try to lift shadows too much, you’ll end up with grainy, noisy areas in the photograph that look unnatural and soft. The best policy is to try to get exposure correct in camera (isn’t that always the way?) This can be tricky though, because you can end up fighting the sky for correct exposure. In general I’d recommend over-exposing a little with exposure compensation to bring up the shadows. But don’t do this so much that any of the bird over-exposes. You can’t recover blown highlights, even in RAW, so that’s your gauge for maximum over-exposure. The way to achieve this is by trial and error and examining your flashing highlights indicator and histogram. Switch these display options on (in your playback options) as they’ll indicate when you’ve gone too far with exposure. Just a tiny side-note about this is that I’ve noticed that my Nikon cameras are somewhat over-cautious with flashing highlights and small areas that are slightly over-exposed can indeed be recovered in post production when shooting RAW. That’s just my D4 and D800E though, so try it on your camera.
If you’re having problems with exposure, you could try adding a burst of flash to light up the underside of the bird. The requires the bird to be near enough for you to reach it of course, but it’s often a practical way of balancing out a strong back-light and under-exposed bird.
If ind doubt, always expose correctly for the bird at the risk of blowing the sky to bits. After all, it’s the wildlife you’re interested in, rather than the sky.

Gulls like this kittiwake are more predictable in flight than a lot of birds
Negative space
In general, I like to put a bit of space on one side of a bird that is flying across my view from one side to the other. This is because it’s natural for the eye to want the bird to fly into space, rather than crash into the edge of the picture! This can go hand-in-hand with the old rule of thirds, whereby you position your subject on one of the cross points of an imaginary noughts & crosses (tic-tac-toe) grid so that the bird is off centre.
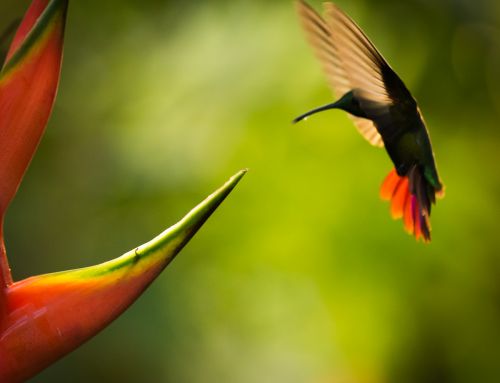
Pre-focus
Sometimes it’s impossible to follow a bird in flight. Hummingbirds are a case in point. The best policy with awkward customers like this is to try to predict where they’re going to be and manually pre-focus your lens at that point. Then it’s all down to timing the shot correctly when the bird comes into that sweet-spot.
Practise on gulls
You may not be particularly interested in gulls (I personally love them), but they’re ideal subjects to practise birds in flight shots. This is because their flight path tends to be more linear and smooth than a lot of the more erratic birds you’ll encounter. They tend to glide around relatively slowly, which makes them ideal to practise on.
Now over to you! Let me know how you get on and if I’ve missed anything that you’d like me to cover.
Practise on more interesting birds!
If you’ve enjoyed this article, but you’d like me to help you get the best out of your flight shots in person, why not come on a photo safari, where you’ll get plenty of opportunities to photograph amazing birds like eagles, rollers and vultures as well as the usual big 5.

On a workshop or safari, you can try again and again to get the perfect shot. I’ll be on hand at all times to help
[…] How to photograph birds in flight […]