
Lion cub – part of a breeding and release project in Zimbabwe. This was taken with a 1/3200 sec shutter speed. f/1.4 isn’t optimal for this 50mm lens, but at least the shutter speed freezes all motion. As usual with wildlife, the eyes are the most important thing to focus on, even if the rest of the image is blurred. I was lying down with my elbows on the ground for stability here.

Camera and lens braced against three things: my face and both hands. Notice the vertical left hand supporting the lens barrel and arms tucked into the body. Look at those hairy gorilla arms! I’d be crap as a pro cyclist
Sharp shots are usually essential in photography. Well, ok I can think of several types of image where you’d want some sort of creative blur – to portray a sense of movement for example. But more often than not, sharpness is king.
So, do you need a tripod to obtain sharp shots? I originally started this piece on tripods and camera support but quickly realised that a separate article on tripods, monopods, beanbags and other camera support was required to do that justice..
This article is about maximising your chances of getting great, sharp shots hand-held.
Brace, brace!
A very often overlooked part of camera technique is how to hold the thing in the first place. Hold the camera to your eye as normal and put your right hand where it usually goes. The left hand is where I see a lot of people going wrong though. The best place for it is underneath the lens barrel with your elbow pointing down and into your chest / stomach. Tuck both elbows into your body and you’ve effectively braced the camera and lens against yourself, which will cut down on a lot of unnecessary vibration through the arms.
If you have the opportunity, you can also brace yourself / the camera against a tree or building or whatever’s around.
A recent trip to Costa Rica gave this position a really good workout. I took my Nikon D4 with a 300mm f/2.8 lens and that was what I shot almost everything with. I took a tripod and it came out for a few days but was quickly ditched in the rainforest because I prefer to have total freedom of movement. The D4 and 300mm was a fantastic combination: the D4’s legendary ISO performance coupled with the 300mm’s razor sharp shooting at wide apertures meant I could hand-hold in gloomy conditions.

Rufous-tailed jacamar, Corcovado National Park, Costa Rica. This shot was taken hand-held at 600mm (300mm f/2.8 lens + 2x teleconverter) on a Nikon D4 body. ISO 4000 at f/5.6 gave 1/200 sec – just enough speed with image stabilisation to get a sharp shot. It was pretty dark!
What’s a good shutter speed to avoid camera shake?
It’s hard to recommend an exact shutter speed because some of us are more shaky than others! A tripod will disconnect us (the shaky thing) from the camera (the steady thing) so that the latter can take a sharp shot when the shutter speed would be too slow to hand-hold.
However, I must admit that I far prefer to shoot hand-held if I can get away with it as it allows so much more freedom, particularly if I’m following something fast moving like birds in flight. You can get a good idea of what will work hand-held by using a shutter speed that is at least as fast as the number of millimetres of focal length you’re using. Let me explain: if you’re using a 400mm lens, you need at least 1/400 sec to hand-hold.
That’s a nice simple rule for full frame sensors, but a lot of cameras have cropped sensors (so-called APS-C size) and this needs to be taken into account by multiplying the speed by the crop factor. Typical crop factors are 1.5x (most Nikon), 1.6x (most Canon) and there are others at 1.7x and even 2x and above. Taking Nikon’s D3300 APS-C sensor SLR as an example, our 400mm becomes 600mm (400 x 1.5). This means you’d need 1/600 sec to take a steady hand-held shot. There isn’t a 1/600 sec setting, so you’d have to set 1/800 sec.
Image Stabilisation
If your lens or camera body has image stabilisation (aka vibration reduction or optical stabilisation) built in, you can use significantly slower shutter speeds when hand-holding. The degree of stabilisation depends on the technology being employed and is usually quoted in ‘stops’. If you’re not familiar with stops in photography, for our purposes here it’s a way of expressing doubles of shutter speed where one stop equals double the speed.
So, if the amount of light available dictates a shutter speed of 1/100 sec but you have 4-stop image stabilisation, this is the equivalent of using a shutter speed 16 times faster, i.e. 1/1600 sec. It’s 16 times faster because each stop gives double the speed: 2 x 2 x 2 x 2 = 16.
Keeping with our example of the Nikon D3300 with a 400mm lens (effectively 600mm on a cropped sensor), you could actually just about get away with 1/50 sec if the lens has 4 stops of stabilisation. This make a massive difference.
Bear in mind though that this 1/100 might give you a sharp image of a static object, but 1/100 sec will rarely freeze the motion of any subject that is moving. So, there’s a big difference between overcoming camera shake with image stabilisation and having enough shutter speed to stop a moving object.
Image stabilisation often has more than one mode available to set. For example, there might be a ‘tripod’ setting, which optimises the stabilisation for the characteristics of tripod vibration. Some lenses have a mode that’s used while panning so that only one axis of vibration is cut out. My experience with this is that Canon’s lenses employ this second mode as an option, whereas Nikon claim their VR lenses automatically detect panning. Sometimes there’s an ‘active’ mode, which is used for very bumpy situations such as shooting from a moving vehicle.

Victoria Falls – hand-held from a helicopter taken at 1/1600 sec to avoid vibration caused by the aircraft
Shooting from Vehicles
It’s not always humans that cause camera shake. Vibration from cars, boats and aircraft can ruin images. There’s a combination here of the movement of the vehicle as it travels and the engine itself causing a different frequency of vibration. The only way to get past this is trial and error, erring on the side of as fast a shutter speed as possible. I took a series of images of Victoria Falls from a helicopter and needed at least 1/1600 sec to avoid the aircraft’s motion softening the image. Image stabilisation can help of course, although I didn’t have it on the lens I was using in the helicopter. You can cut out some of the motion, by stopping the car or boat’s motor as you shoot. Although I wouldn’t recommend doing this with a helicopter!
Aperture and lens choice
Some lenses are inherently sharper than others. Prime lenses are usually better than zooms and professional lenses are sharper than consumer models. It’s also worth knowing that each lens has an optimum range of apertures where it achieves best resolution of the image, and therefore the sharpest shots. Lens characteristics vary considerably from lens to lens and there are reference sources where you can look up your own lenses.
In general though, the advice is to shoot with the lens stopped down two or three stops of aperture from the maximum aperture of the lens for optimum sharpness.
So, if you have a lens with a maximum aperture of f/4, the sharpest shots are likely to be had at around f/8 to f/11. With the exception of very expensive optics, most lenses are a bit soft at wide open aperture. That’s a shame because background blur (bokeh) is a lovely thing with a wide open lens.
Lens construction, materials and coatings are getting better all the time, but you should still be aware that always shooting wide open may not result in the best images. This is something of a kick in the teeth for anyone who needs to shoot in low light! In order to achieve the fastest shutter speed, it’s necessary to open the lens up to it widest aperture to let as much light in as possible. Such is life and this is one of the many compromises in photography.
My advice about lenses is pay as much as you can for the best you can afford. Unless you’ve been conned, an expensive lens will resolve light into sharper detail on the sensor at a wider range of apertures than a cheaper model.
An Aperture too far
Don’t assume that closing down a lens’s aperture to its minimum value (say, f/22 for example) will result in the sharpest images. Another factor comes into play when the hole that the light passes through gets tiny: diffraction. Diffraction is where the rays of light separate out as they emerge from a small aperture and end up arriving at the sensor at slightly different times as they fan out – the outer rays have further to travel. This spreads the light across more sensels (sensor pixels) than necessary and the individual light rays interfere with each other to create light and dark areas, effectively smudging the image.
I should also point out that if you shoot everything at f/22, not only will all your images have distracting backgrounds due to the large depth of field, but this small aperture won’t let much light in at all. In turn, you’ll need a slower shutter speed or higher ISO value (or both) to expose the picture properly, potentially introducing camera shake and image noise respectively.
Remember that a lens has a range of optimum apertures somewhere in the middle of its maximum and minimum apertures. This is usually between a couple of stops from maximum aperture and a couple from minimum.
Noise
You may already know that using a high ISO setting on your camera can introduce unwanted noise into the resulting image. It’s another photographic irony that increasing ISO in order to obtain faster shutter speeds and a corresponding reduction in camera shake can soften the image due to the amount of noise present. You’ll have to experiment with what you find acceptable for your camera, but you’ll find that after a certain value of ISO, the camera will record less detail and dynamic range and your pictures will need more noise reduction in post-production. And, you guessed it, noise reduction reduces sharpness.
Flash
If you’re concerned about noise in low light conditions, why not use a bit of flash? This will instantly alleviate the problem of noise and can also give you an effective shutter speed far greater than that indicated on the camera. How so? Well, in dark conditions, you set the camera’s exposure to deliberately underexpose whilst making the flash do all the work. In these conditions the flash’s duration is much shorter than the camera’s shutter is open and you’ll be able to freeze the motion of your subject at anything up to 1/38500 sec. I go into more detail on flash techniques in this post on photographing swallows.

Male red-legged honeycreeper taken in gloomy Costa Rican conditions. With flash, however, the whole bird lights up and noise doesn’t affect sharpness at the lower ISO setting used
Cleanliness is next to sharpness
It should go without saying that keeping the glass on the front and rear elements of your lenses clean gives light the most unobstructed path possible. I say it should, but I’m a bad example myself! Using a rocket blower and soft wipes as well as the occasional lens cleaning fluid is recommended. To a certain extent, shooting with a wide aperture ‘looks’ straight through a lot of dirt because the depth of field is so small and the focal point is pushed so far away from the lens. But it’s good practise to keep everything clean and anyway, as we discussed above, not all lenses can produce sharp images at maximum aperture.
The same goes for the sensor itself. I find that I can use products like the Arctic Butterfly and so on to remove a certain amount of the crap that accumulates on sensors, but every now and again I take my cameras to have their sensors professionally cleaned.
Dirty Air
The quality of the air through which you shoot can have an impact on sharpness, particularly if you’re shooting through a long lens which compresses a lot of space in front of you. It’s likely that if you’re shooting hand-held you’ll just shoot in whatever conditions you’re given, but be aware that the compression effect of long focal lengths will exacerbate the softening of an image. Haze, smog and any other atmospheric particulates can build up and have an effect.
Rapid fire
An interesting effect comes into play at slow shutter speeds and fast frame rates. If you have no option but to shoot at a slow shutter speed in low light, jack the frame rate up to its maximum, brace yourself as much as possible and take a series of exposures in quick succession. You’ll need to change the drive mode of the camera to continuous shooting. It’s a phenomenon I find difficult to explain (because I don’t understand why it works!) but there’s a very high chance that one of the shots in the sequence will actually be sharp. Go on, give it a go.
And Breathe…
If you’re forced to use a slightly slower shutter speed than you’d like when hand-holding, pressing the shutter whilst breathing out in a long breath ensures that the movement created by breathing is controlled and steady and has less impact on shaking the camera.
The Eyes Have It
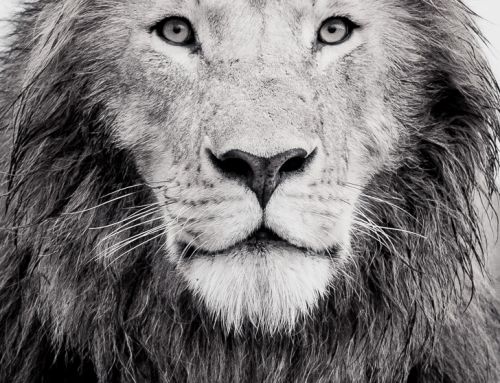
When we’re talking about sharpness, it’s rare for an entire image to be completely sharp and in focus across the whole photo. In fact, artistically speaking, you’d normally want to avoid this as it can confuse the message in the picture. Using sharpness to call a viewer’s attention to a particular part of the photograph is an important compositional tool and you should consider which part of the image needs to be sharp for this reason. The eyes in humans and wildlife alike are usually the most important part of a photograph to have sharp for two reasons: firstly because the human brain is wired to look for sharpness and will go for areas in focus before anything else; and secondly because eyes are what we look for to create a connection between us.
The lion at the top of this page is a good example of why only a small part of a photograph needs to be sharp: the eyes. Even a single eye is enough to make a personal connection to the subject of the image. The shot below of the seal’s whiskers shows when to break this rule:

This image of a grey seal pup won a Highly Commended award in 2013. I think the appeal is that the focus is on the bristles and nose, rather than on the eyes. This works because it says something about how the seal hunts for food and therefore it’s acceptable not to focus on the eyes
Hyperfocal distance
Hyperfocal distance is one of those things that’s really only practical for static landscape type shots and not usually in hand-held photography. But you can maximise your chances of getting the best sharpness for the largest depth of field by focusing at or near the hyperfocal distance.
If you don’t have a lookup-table or smartphone app at hand to calculate this for you, a very rough guide is that about a third of the scene in front of the point of focus will be acceptably sharp and about two-thirds behind it. The actual depth of field depends on the aperture you’ve set and the focal length, but focussing about a third of the way into a scene is a good start.
Having said this, shooting hand-held is usually more about focusing on a particular subject (like an animal or person) and getting that subject sharp, rather than looking for maximal sharpness right throughout an image. I’ve just mentioned it here for completeness.
And finally…
Don’t get that hung up on sharpness! I hope the image of my youngest daughter laughing shows that sharpness isn’t always important to create an engaging image:

Not an ounce of this photograph is sharp and I don’t care!
Thank you for these fantastic tips on getting sharp images when hand-holding a camera! Your advice on steadying my grip, using faster shutter speeds, and controlling my breathing has been so helpful. It’s great to have such practical steps to avoid blurry shots, especially for someone like me who loves to shoot on the go. Can’t wait to put these tips into practice!
Very helpful content for beginners.