
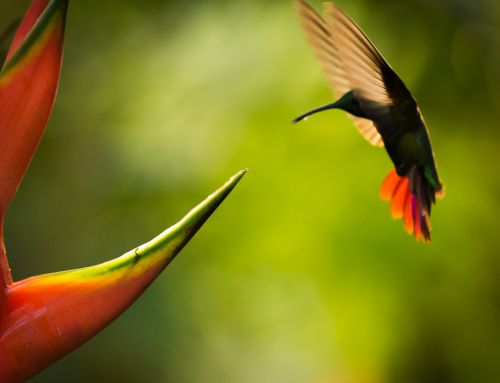
Male urban peregrine falcon – a shot like this taken at 1200mm (600mm + 2x converter) simply can’t be taken without a tripod. Nikon D800E, 600mm f/4 lens, 1/400sec , f/11, ISO 1600, Manfrotto 055CXPRO4 carbon fibre tripod with Wimberley Head
| Tripod? Monopod? Gorillapod? Baffled? Read on! |
Whether or not to use a tripod is one of those questions I’m asked before several of my workshops – I suspect because people would prefer not to lug a tripod around the Farne Islands for example, which is fair enough!
This article is mostly about using tripods and other forms of support like beanbags and monopods for outdoor photography and in particular wildlife and nature photography. I’ve written a separate post on maximising your chances of getting great shots hand-held. In fact a lot of the information in that article will be useful even when you’re using a tripod to further minimise camera shake and the two posts are companion articles.
But do you need a tripod to obtain sharp shots? There are several situations when some kind of support for your camera and lens are required and this support comes in a multitude of forms. Let’s look at when to use a tripod, monopod, beanbag, or any other type of support – and when to leave it at home.
So what’s a tripod for anyway?
In short: to avoid camera shake. But it’s also useful for framing a shot when the camera is to remain static (landscapes and architectural photography spring to mind) and is an essential staple in most videography to ensure shake-free footage and smooth movements during a scene.
Whenever you have a situation where the shutter speed of the camera is too slow for hand-holding, camera movement can ruin a shot by making the image soft. It’s simply down to the fact that the image moves about on the sensor as the camera exposes the image. The longer the shutter speed, the more pronounced the effect and the more stable and still the camera needs to be to avoid shaky shots. Generally, the faster the shutter speed you can use, the more camera shake is eliminated. However, a fast shutter speed is often not practical. It isn’t just limited to the effect of us as humans handling the camera either, but anything that can shake a camera, including wind.
 This shot of a red grouse was taken using a bean-bag resting on my car door
Choosing a tripod
Wooden tripods are, mostly, a thing of the past and usually you’ll find aluminium or carbon fibre as the main materials used. Aluminium is heavier and cheaper than carbon fibre, but the latter is a lot lighter. When choosing a tripod, make sure it’s as stiff as possible when fully extended. Tripods are rated for the weight they can carry, so make sure you buy one that’s sturdy enough. If you put a long lens and camera on a tripod and tap on the legs lightly while looking through the viewfinder, you’ll see the image wobble if the tripod isn’t stiff enough.
Three legs, one leg, or, er six legs?!
Tripod literally means ‘three footed’ and three legs are the most common form of camera support. Leaving aside the three-legged school sports day race, which appears to have been designed to make children as unstable as possible, three feet on the ground stabilises in three dimensions on any surface, even if the ground is uneven. But what about a monopod? One foot is certainly not as stable as three, but is usually a lot lighter, more portable and simpler to use.
Most monopods are portable enough to carry with you when a tripod is out of the question. Some have fold out feet, which emerge from the bottom tube. This isn’t a substitute for a tripod, but can make a good, firm base when there’s no alternative. I’ve also seen walking poles that double up as monopods with a screw head.
What’s all this about six legs, then? Well, if you’ve ever seen anyone using a highly curious beast that resembles a metallic spider more than a camera support, they may well have been using a double tripod setup.
This is an extremely stable setup for use in very challenging situations – typically where a very long lens is being used with a teleconverter in windy conditions. The long focal length really amplifies any vibrations and the lens acts as a sail to catch the wind.
I’ve only rarely ever used this (because it means lugging two tripods around), but the idea is to fix two points on the camera setup, rather than just one. The front tripod attaches to the lens foot and the rear tripod to the camera body.
A modification to this double tripod setup is to use a monopod on the back (camera end), which means a bit less to carry round.
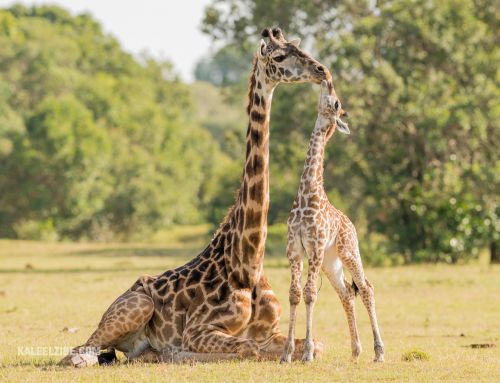
 This shot was taken from a boat in Botswana using a tripod and Wimberley Head
Centre Columns
Not all tripods have centre columns, but those that do, have a central tube that runs through the tripod collar where the legs meet at the top. This column is used to extend the tripod height above the collar. In general, a short centre column is a good idea. It’s tempting to extend this column above the collar to increase height, but be aware that the higher you go with this single rod, the more instability it will introduce. It’s better to buy a taller tripod than to extend above the collar.
Some tripods have a reversible centre column, which allows you to turn the camera upside down and get close to the ground. Others have a completely flexible centre column (like the Gitzo Explorer top right) which means you can have the camera in pretty much any position. Great for low and awkward shots and particularly macro photography.
Head Hunting
A tripod has a screw on the top end to either attach the camera directly (in an immovable position), or more usually a tripod head with which to attach the camera whilst giving freedom of motion.
A monopod can be used without a head because you can move the whole leg around while keeping the foot on the ground. But it still doesn’t give you the freedom of motion that a head would give you, so you can add a head onto the top of the ‘pod.
Heads come in quite a variety of forms and all will be rated for a particular maximum weight. This is important because if you try to balance and move a camera and lens on top of a head that can’t cope, it’s unlikely the camera position will stay where you want it.
The heads most useful for wildlife photography are gimbal heads and fluid heads. Gimbal heads, such as the Wimberley Head are great at perfectly balancing a big lens on while allowing completely free movement. You can adjust how much movement there is in each axis to fine-tune to the situation in hand. For big lenses, this is my favourite form of shooting.
A lot of people swear by using a fluid head (sometimes called a video head) for large lenses because of the ability to move around smoothly with the handle at the back. I find them quite good, but just not as easy in the field as a gimbal head. They’re superb for video and lighter lenses.
Ball heads have a ball in a socket with a tripod screw. You can get large ball heads that can cope with big lenses, but ball heads are really better suited to smaller lenses.
Three-way geared heads are fantastic for landscape and architectural images, but hopeless with a big lens.
Quick Release
All my tripod heads and cameras have quick release plates attached so I can easily mount and unmount the camera. I’ve found it useful to buy spare plates for the cameras so I know I’ve always got one handy. I can then use other cameras and other equipment (flashes and so on) on one tripod head. Sometimes, as with the Wimberley Head, the release plate attaches to the lens foot.
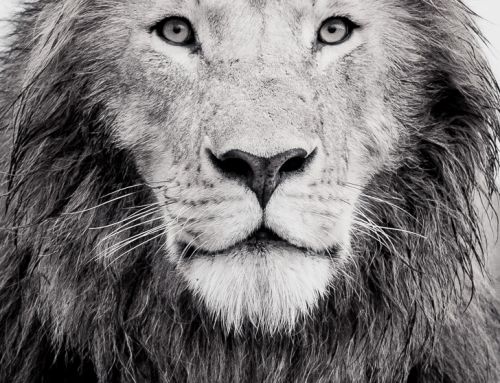
 This shot was taken using a bean bag from a vehicle (engine off)
Extra stability
When you’re using tripods or monopods, remember to keep the centre column short. Here are a few other tips. You can put your hand on top of the lens to dampen down vibrations. A heavy bag or other weight can be hung from the bottom of the centre column if it has a hook. This can really help with vibrations. If you’re forced to use very slow shutter speeds, you can use a remote release cable or wireless remote to disconnect yourself from the camera.
A similar effect can be achieved by using the self timer function or Exposure Delay (Nikon only I think) to create a short delay between the shutter button being pressed and the shot being taken. Lastly, if you’re using an SLR, you can use mirror lock-up to create a two stage shutter operation. The first press of the shutter button raises the mirror out of the way and the second press (best done via a remote release) actually fires the shutter. What this does is get all vibrations associated with raising the mirror out of the way before the shot is taken.
Legless
If you’re in a hide or a vehicle, tripods and monopods can actually be a nuisance. If you’re not tripping over the legs, or finding that the head plus lens doesn’t fit through the opening, you’re rueing the fixed position that doesn’t allow full movement. Enter: the beanbag.
A beanbag is arguably more stable than a tripod or monopod because it has a very wide base to put your camera or lens on and is only a few centimetres high. That’s obviously no good in outdoor situations where you have to walk around and place the camera somewhere stable (except for ground shots), but a beanbag is a godsend in a hide or car.
Beanbags come in two main flavours: single and double. The double bags are better because they’re bigger and have a natural channel to rest your camera and lens on the top where the two bags meet.
Beanbags are also flexible. They’re often filled with rice and (not surprisingly) beans, but you can fill them full of pretty much anything, including earth. The beauty when travelling by air with them is that you carry them empty and fill them when you arrive. I actually use polystyrene balls to fill mine, which weigh virtually nothing. This is great for general, year round use, although I have to top the bag up every now and again as the balls squash over time. The support isn’t quite as sturdy as with rice either, but the portability of it means that’s my filler of choice most of the year round.
I have heard of a cautionary tale of elephants taking a fancy to the food content of someone’s beanbag, but thankfully I think this is rare!
I’ll get my coat
If you haven’t got a beanbag handy, a coat or fleece will do – folded or scrunched up. They’re not as good as a beanbag, but in those situations where you’ve left yours at home and an opportunity arises, they’re a good option.
Other options
Gorillapods are a great invention: they allow you to wrap their three, flexible legs around anything: a branch or fence post for example. You can also use them for low-level shooting. I often have one in my backpack even when I’m carrying one of my usual tripods. A great example would be for squirrel photography. I’ve set a gorillapod up with a camera and wide angle lens and remotely triggered the shutter. This low position gives a great viewpoint.
Ground pods are are a good option if you need to get down really low. These can be bought (or even made out of a frying pan with a screw mount in it!) and they take a tripod head, including a gimbal head. This means you can use even a really big lens very close to the ground and still achieve nice, fluid movements. They have a flat base, which means you can move them around on the ground easily.
Studio lighting stands are a potential option – sort of. They really aren’t flexible and usually come with fixed, fold-out legs that need a very flat surface, but if you have one handy, they can be used in certain circumstances. They’re not much use outdoors, although I have used them when I’ve needed the camera in a fixed position and have already used both my tripods for wireless flashes.
Foot cords are something I’ve never seen anyone use! Indeed I’ve never tried one myself, although I know they exist. They consist of a cord with a screw to attach to the camera base and are obviously very light weight. The principle is that you put your foot on the end of the cord and pull the camera upwards until the cord is tight. In this position, the amount of vertical movement is limited and therefore it cuts down on some vibration.
Well, I hope you’ve enjoyed the article. If I’ve missed anything, or you’d like me to expand on something a little more, drop me an email or leave a comment on the post and I’ll try to include your suggestion.
By the way, the answer to whether you should bring a tripod to the Farnes or leave it at home is that if you bring one, you won’t need it, but if you don’t, you’ll wish you had…

Shot using a camera on a Gorillapod and a remote release, the low angle gives an intimate perspective on this red squirrel

My carbon fibre Gitzo Explorer Mk2 G2227 with Wimberley Head supporting the 600mm f/4 lens

The Wimberley Head is a gimbal, which allows smooth and free two-axis motion for big lenses. This setup perfectly balances even the heaviest of equipment

A fairly lightweight monopod with a 300mm f/2.8 lens. Not as sturdy as a tripod, but much more portable and lightweight
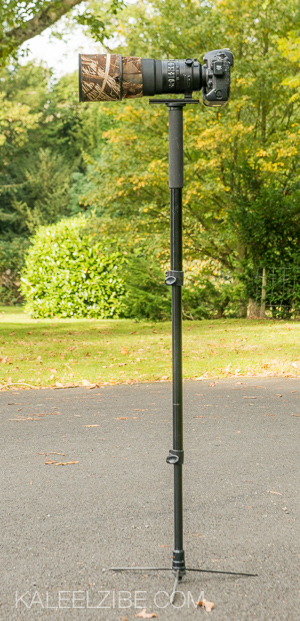
A more substantial monopod with fold-out feet. Very convenient and more stable than a thinner, lighter monopod, but much heavier

Using a bag to weigh down my Manfrotto 055CXPRO4 carbon tripod. The bag damps down vibrations, especially in wind. And it was very windy at Bamburgh Castle that day!

Six legs! Two tripods: one on the lens and one on the camera. The camera bag adds vertical stability

A closer look at the double-tripod setup. Note the remote shutter release cable so I don’t even have to touch the camera

A more substantial Gitzo GT5541LS tripod for heavy work. Taken by my friend, Alan Hewitt for N-Photo magazine. In fact it’s his tripod and I wish I’d kept it! If you’re wondering about the gaffer tape, the magazine wanted to know what my 5 essential pieces of equipment are. The world would fall apart without gaffer tape

A Gorillapod in action. The legs can be put in any position, or wrapped around an object

Coat-pod!
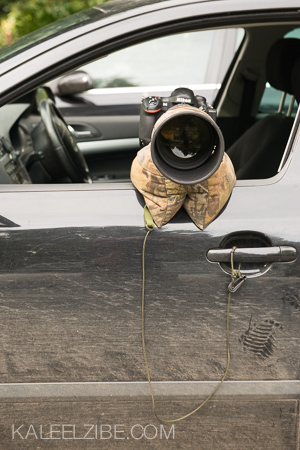
A double beanbag on my car. And yes, it’s always this filthy. Note the cord to attach to the car. A very thoughtful addition to a beanbag. Imagine photographing a lion in the Masai Mara 10 feet from your vehicle when the beanbag drops out in your excitement. That’s why they have a safety cord

My Manfrotto 501HDV Pro fluid head, also known as a video head. It allows lovely, damped pan and tilt motion for video and can be very useful for most short to medium lenses. I prefer not to use them for long lenses

My Manfrotto 405 Pro geared three-way head. Great for landscape shots and fine adjustments. Rubbish for anything that moves

This is what the underside of a tripod head looks like with a quick-release plate. The two halves of the plate attach to each other in no time
[…] Tripods, monopods, beanbags and other camera supports […]